
Stripped nearly bare by sheep and deer, the rock strewn hills and empty meadows greet you with a sense of adventure as you travel throughout rugged landscapes of the Highlands, thick with mist and towering mountains.
Whilst freely roaming through rolling hills of lush green and heather, the Glencoe Tartan Poncho provides ample room for those on-the-go needing a soft garment to retreat into. Simple comfort elevated by carefully chosen details, this pullover will have you feeling bundled in the winter months, all thanks to the timeless turtleneck and flowy, flattering drape. Side vents and exaggerated sizing give this garment easy style, while the rich, mirrored tartan design harkens back to the past, brought beautifully up-to-date in a modern piece with lasting appeal.


With a flask of tea slipped into your bag, the misty moors offer a compelling place to head as you wander through the valleys enveloped in your newfound companion, the Glencoe Tartan Poncho… The kind of perfect pullover that is day-in-and-day-out cozy and comfortable!
As with my Meara Fisherman Sweater, there is something so satisfying about the squish factor of Lion Brand’s Wool-Ease, so I knew I wanted to incorporate a similar cosiness into this pullover as well. I decided on a combination of Lion Brand Wool-Ease and Touch of Alpaca (a new favorite of mine!), as their versatility, durability, and color range worked perfectly together.

This is a wonderfully uncomplicated pattern that will challenge beginners and keep experienced crocheters interested, as creating a tartan design with crochet is a great way to expand your skills and learn a new tool that can really elevate your work.
Crocheted in aran weight yarn, the Glencoe Tartan Poncho uses both single crochets and a woven technique to bring you a modern yet cosy winter essential!.. Perfect for weekend lounging as it is for exploratory outings. Scroll down to find the free pattern, purchase an ad-free printable version here, or head to Lion Brand to snag the yarn kit.

Add To Cart
Purchase the ad-free, printable PDF pattern here.
Purchase the yarn kit from Lion Brand here.
Materials
6mm (J/10) Crochet Hook
8mm (L/11) Crochet Hook
2625yds Aran (10ply) Yarn
— Lion Brand “Wool-Ease” 098/Natural Heather (11 skeins), Color A
— Lion Brand “Touch of Alpaca” 152/Charcoal (2 skeins), Color B
— Lion Brand “Touch of Alpaca” 138/Crimson (1 skein), Color C
Tapestry Needle; Stitch Markers;
Finished Size
Width: 43″ (109cm)
Length: 27” (69cm)
Gauge
10 stitches + 13 rows = 4″/10cm using 8mm in sc
Stitches & Abbreviations
st(s) – stitch(es)
ch – chain stitch
sl st – slip stitch
sc – single crochet
blsc – back loop single crochet
sc2tog – single crochet 2 together
Single Crochet 2 Together (sc2tog)
Insert hook in the next st. YO, draw up a loop (2 loops on hook). Insert hook in the next st. YO, draw up a loop (3 loops on hook). YO, and draw through all 3 loops on hook.
Skill Level
This is an “Easy” level crochet pattern (includes “How-To” photos). You must be familiar with basic crochet stitches and techniques. Directions written so that they are easy to read and follow. All patterns are in English, and written in standard US terms.

+ PATTERN
Note: Garment is worked in 2 panels side to side that are seamed together at the shoulders to create the final poncho. The roll neck is worked in the row, side to side, and seamed to the neckline. It is imperative to check gauge and maintain an even tension throughout to ensure pieces ft together. This is an easy level crochet pattern and the techniques involved are single crochet, decreasing stitches, and basic embroidery skills.
+ FRONT OF PONCHO
Ch72 using A yarn and 8mm hook.
Row 1: 1 sc in 2nd ch from hook, 1 sc in next 14 sts. 1 sc in next 8 sts in “B”. 1 sc in next 8 sts in “A”. 1 sc in next 3 sts in “C”. 1 sc in next 33 sts in “A”. 1 sc in next 4 sts in “B”. Turn your work. (71 sts)
Row 2: Ch1, 1 sc in same st, 1 sc in next 3 sts. 1 sc in next 33 sts in “A”. 1 sc in next 3 sts in “C”. 1 sc in next 8 sts in “A”. 1 sc in next 8 sts in “B”. 1 sc in next 15 sts in “A”. Turn your work. (71 sts)
Row 3: Ch1, 1 sc in same st, 1 sc in next 14 sts. 1 sc in next 8 sts in “B”. 1 sc in next 8 sts in “A”. 1 sc in next 3 sts in “C”. 1 sc in next 33 sts in “A”. 1 sc in next 4 sts in “B”. Turn your work. (71 sts)
Row 4 – 51: Repeat row 2 – 3.
Row 52: In “A”, ch1, 1 sc in same st, 1 sc in next 3 sts in “B”. 1 sc in next 33 sts in “A”. 1 sc in next 3 sts in “C”. 1 sc in next 8 sts in “A”. 1 sc in next 8 sts in “B”. 1 sc in next 15 sts in “A”. Turn your work. (71 sts)
Row 53: Ch1, 1 sc in same st, 1 sc in next 14 sts. 1 sc in next 8 sts in “B”. 1 sc in next 8 sts in “A”. 1 sc in next 3 sts in “C”. 1 sc in next 33 sts in “A”. 1 sc in next st in “B”. 1 sc in next st in “A”, 1 sc2tog (creating neckline). Turn your work. (70 sts)
Row 54: Ch1, 1 sc2tog, in same st, 1 sc in next 34 sts in “A”. 1 sc in next 3 sts in “C”. 1 sc in next 8 sts in “A”. 1 sc in next 8 sts in “B”. 1 sc in next 15 sts in “A”. Turn your work. (69 sts)
Row 55: Ch1, 1 sc in same st, 1 sc in next 14 sts. 1 sc in next 8 sts in “B”. 1 sc in next 8 sts in “A”. 1 sc in next 3 sts in “C”. 1 sc in next 33 sts in “A”, 1 sc2tog. Turn your work. (68 sts)
Row 56: Ch1, 1 sc2tog, in same st, 1 sc in next 32 sts in “A”. 1 sc in next 3 sts in “C”. 1 sc in next 8 sts in “A”. 1 sc in next 8 sts in “B”. 1 sc in next 15 sts in “A”. Turn your work. (67 sts)
Row 57: Ch1, 1 sc in same st, 1 sc in next 14 sts. 1 sc in next 8 sts in “B”. 1 sc in next 8 sts in “A”. 1 sc in next 3 sts in “C”. 1 sc in next 33 sts in “A”. Turn your work. (67 sts)
Row 58: Ch1, 1 sc in same st, 1 sc in next 32 sts in “A”. 1 sc in next 3 sts in “C”. 1 sc in next 8 sts in “A”. 1 sc in next 8 sts in “B”. 1 sc in next 15 sts in “A”. Turn your work. (67 sts)
Row 59 – 80: Repeat row 57 – 58.
Row 81: Repeat row 57.
Row 82: Ch1, 2 sc in same st, 1 sc in next 32 sts in “A”. 1 sc in next 3 sts in “C”. 1 sc in next 8 sts in “A”. 1 sc in next 8 sts in “B”. 1 sc in next 15 sts in “A”. Turn your work. (68 sts)
Row 83: Ch1, 1 sc in same st, 1 sc in next 14 sts. 1 sc in next 8 sts in “B”. 1 sc in next 8 sts in “A”. 1 sc in next 3 sts in “C”. 1 sc in next 33 sts in “A”, 1 sc in next st, 1 sc in turning ch. Turn your work. (69 sts)
Row 84: Ch1, 2 sc in same st, 1 sc in next 34 sts in “A”. 1 sc in next 3 sts in “C”. 1 sc in next 8 sts in “A”. 1 sc in next 8 sts in “B”. 1 sc in next 15 sts in “A”. Turn your work. (70 sts)
Row 85: Ch1, 1 sc in same st, 1 sc in next 14 sts. 1 sc in next 8 sts in “B”. 1 sc in next 8 sts in “A”. 1 sc in next 3 sts in “C”. 1 sc in next 33 sts in “A”, 1 sc in next st in “B”. 1 sc in next 2 sts in “A”, 1 sc in turning ch. Turn your work. (71 sts)
Row 86: Ch1, 1 sc in same st. 1 sc in next 3 sts in “B”. 1 sc in next 33 sts in “A”. 1 sc in next 3 sts in “C”. 1 sc in next 8 sts in “A”. 1 sc in next 8 sts in “B”. 1 sc in next 15 sts in “A”. Turn your work. (71 sts)
Row 87: Ch1, 1 sc in same st, 1 sc in next 14 sts. 1 sc in next 8 sts in “B”. 1 sc in next 8 sts in “A”. 1 sc in next 3 sts in “C”. 1 sc in next 33 sts in “A”. 1 sc in next 4 sts in “B”. Turn your work. (71 sts)
Row 88: Ch1, 1 sc in same st, 1 sc in next 3 sts. 1 sc in next 33 sts in “A”. 1 sc in next 3 sts in “C”. 1 sc in next 8 sts in “A”. 1 sc in next 8 sts in “B”. 1 sc in next 15 sts in “A”. Turn your work. (71 sts)
Row 89 – 136: Repeat row 87 – 88.
Row 137: Repeat row 87.
Fasten off, and weave in loose ends.
+ BACK OF PONCHO
Ch72 using A yarn and 8mm hook.
Row 1: 1 sc in 2nd ch from hook, 1 sc in next 14 sts. 1 sc in next 8 sts in “B”. 1 sc in next 8 sts in “A”. 1 sc in next 3 sts in “C”. 1 sc in next 33 sts in “A”. 1 sc in next 3 sts in “B”. Turn your work. (70 sts)
Row 2: Ch1, 1 sc in same st, 1 sc in next 2 sts. 1 sc in next 33 sts in “A”. 1 sc in next 3 sts in “C”. 1 sc in next 8 sts in “A”. 1 sc in next 8 sts in “B”. 1 sc in next 15 sts in “A”. Turn your work. (70 sts)
Row 3: Ch1, 1 sc in same st, 1 sc in next 14 sts. 1 sc in next 8 sts in “B”. 1 sc in next 8 sts in “A”. 1 sc in next 3 sts in “C”. 1 sc in next 33 sts in “A”. 1 sc in next 3 sts in “B”. Turn your work. (70 sts)
Row 4 – 51: Repeat row 2 – 3.
Row 52: In “A”, ch1, 1 sc in same st, 1 sc in next 2 sts in “B”. 1 sc in next 33 sts in “A”. 1 sc in next 3 sts in “C”. 1 sc in next 8 sts in “A”. 1 sc in next 8 sts in “B”. 1 sc in next 15 sts in “A”. Turn your work. (70 sts)
Row 53: Ch1, 1 sc in same st, 1 sc in next 14 sts. 1 sc in next 8 sts in “B”. 1 sc in next 8 sts in “A”. 1 sc in next 3 sts in “C”. 1 sc in next 35 sts in “A”, 1 sc2tog (creating neckline). Turn your work. (69 sts)
Row 54: Ch1, 1 sc2tog, in same st, 1 sc in next 33 sts in “A”. 1 sc in next 3 sts in “C”. 1 sc in next 8 sts in “A”. 1 sc in next 8 sts in “B”. 1 sc in next 15 sts in “A”. Turn your work. (68 sts)
Row 55: Ch1, 1 sc in same st, 1 sc in next 14 sts. 1 sc in next 8 sts in “B”. 1 sc in next 8 sts in “A”. 1 sc in next 3 sts in “C”. 1 sc in next 32 sts in “A”, 1 sc2tog. Turn your work. (67 sts)
Row 56: Ch1, 1 sc in same st, 1 sc in next 32 sts in “A”. 1 sc in next 3 sts in “C”. 1 sc in next 8 sts in “A”. 1 sc in next 8 sts in “B”. 1 sc in next 15 sts in “A”. Turn your work. (67 sts)
Row 57: Ch1, 1 sc in same st, 1 sc in next 14 sts. 1 sc in next 8 sts in “B”. 1 sc in next 8 sts in “A”. 1 sc in next 3 sts in “C”. 1 sc in next 33 sts in “A”. Turn your work. (67 sts)
Row 58 – 81: Repeat row 56 – 57.
Row 82: Repeat row 56.
Row 83: Ch1, 1 sc in same st, 1 sc in next 14 sts. 1 sc in next 8 sts in “B”. 1 sc in next 8 sts in “A”. 1 sc in next 3 sts in “C”. 1 sc in next 32 sts in “A”, 1 sc in next st, 1 sc in turning ch. Turn your work. (68 sts)
Row 84: Ch1, 2 sc in same st, 1 sc in next 33 sts in “A”. 1 sc in next 3 sts in “C”. 1 sc in next 8 sts in “A”. 1 sc in next 8 sts in “B”. 1 sc in next 15 sts in “A”. Turn your work. (69 sts)
Row 85: Ch1, 1 sc in same st, 1 sc in next 14 sts. 1 sc in next 8 sts in “B”. 1 sc in next 8 sts in “A”. 1 sc in next 3 sts in “C”. 1 sc in next 34 sts in “A”, 1 sc in next st in “A”, 1 sc in turning ch. Turn your work. (70 sts)
Row 86: Ch1, 1 sc in same st. 1 sc in next 2 sts in “B”. 1 sc in next 33 sts in “A”. 1 sc in next 3 sts in “C”. 1 sc in next 8 sts in “A”. 1 sc in next 8 sts in “B”. 1 sc in next 15 sts in “A”. Turn your work. (70 sts)
Row 87: Ch1, 1 sc in same st, 1 sc in next 14 sts. 1 sc in next 8 sts in “B”. 1 sc in next 8 sts in “A”. 1 sc in next 3 sts in “C”. 1 sc in next 33 sts in “A”. 1 sc in next 3 sts in “B”. Turn your work. (70 sts)
Row 88: Ch1, 1 sc in same st, 1 sc in next 2 sts. 1 sc in next 33 sts in “A”. 1 sc in next 3 sts in “C”. 1 sc in next 8 sts in “A”. 1 sc in next 8 sts in “B”. 1 sc in next 15 sts in “A”. Turn your work. (70 sts)
Row 89 – 136: Repeat row 87 – 88.
Row 137: Repeat row 87.
Fasten off, and weave in loose ends.
+ ASSEMBLY
Follow “Assembly Diagram” below. Block the finished front/back panels of the poncho to correct height/width.
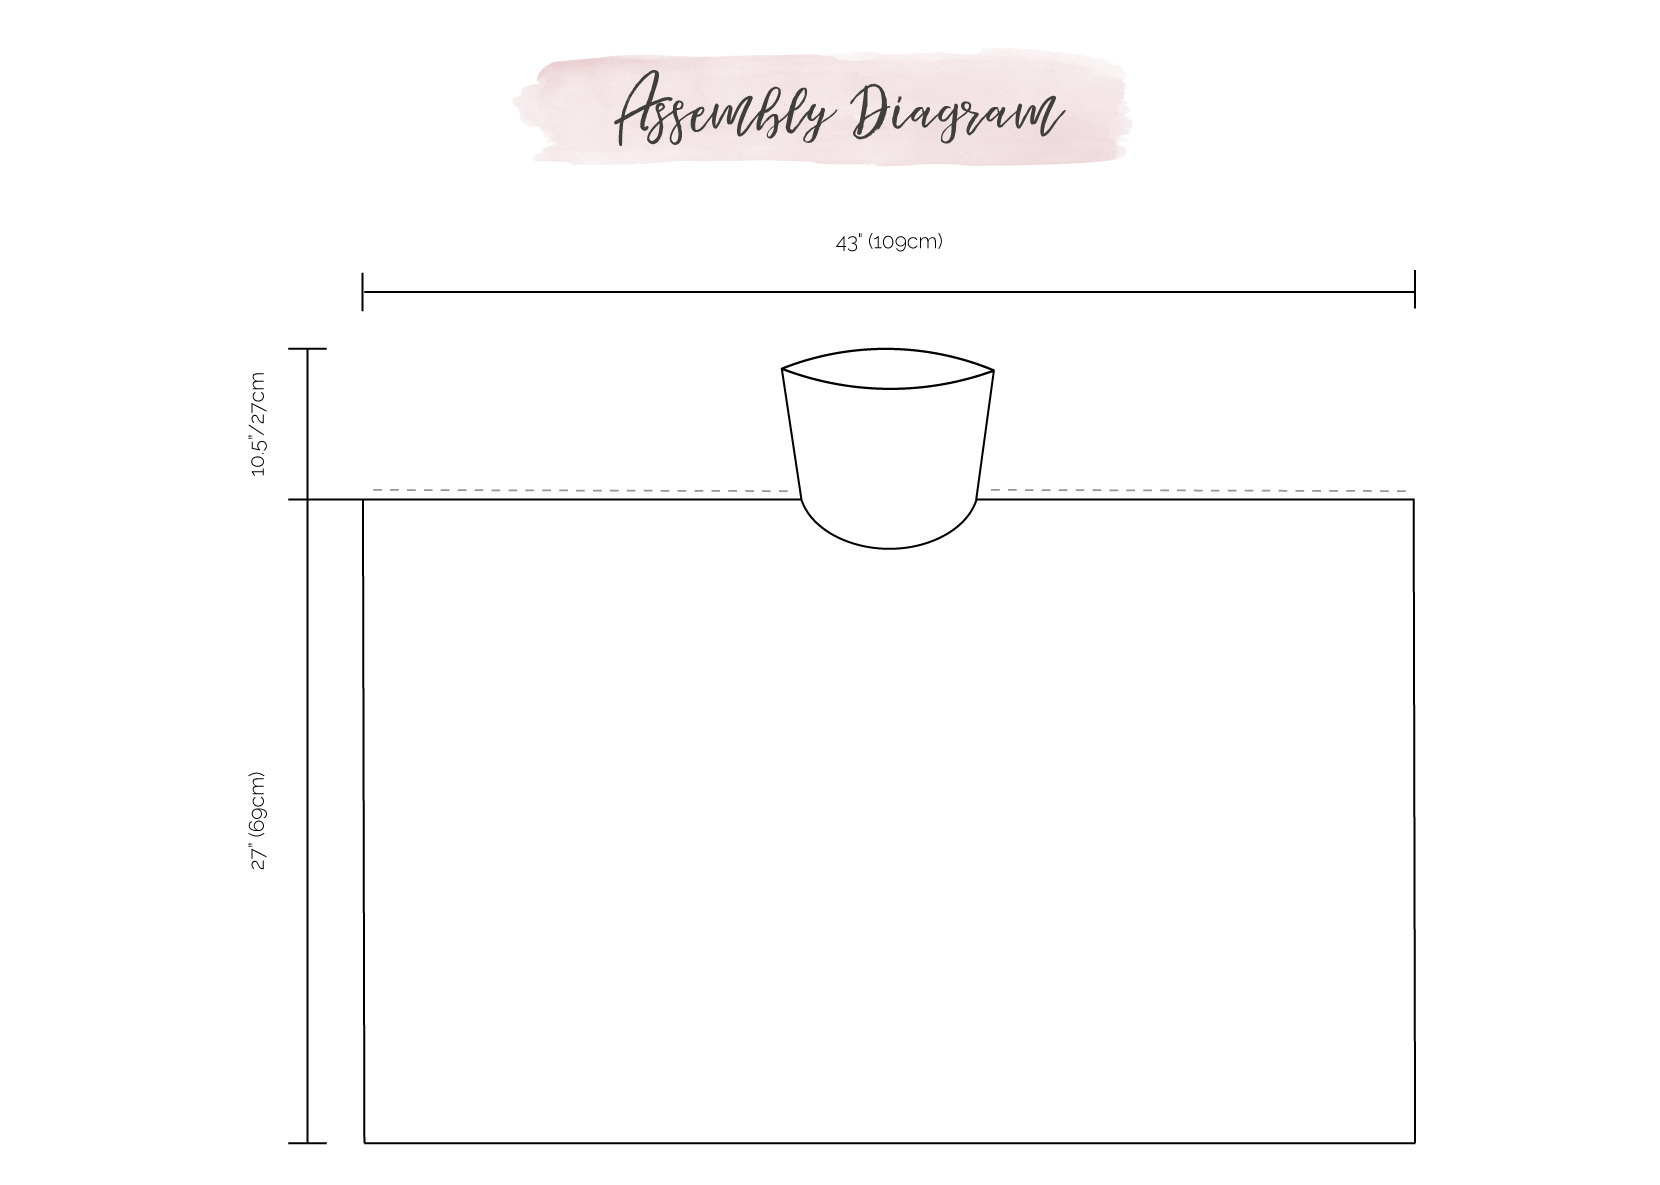
Place the “Front of Poncho” on top of the “Back of Poncho”, flip the layout inside out, and join the two panels together by seaming the shoulders of the two panels – working along the ends of Row 1-52 and then Row 86-137 (the side where the neckline decreases were made). The remaining opening is the neckline.
Fasten off, and weave in loose ends.
+ TARTAN DESIGN
Note: Cut lengths of yarn approx 78”/198cm long, thread 2 strands of yarn onto a tapestry needle, and use the chart below as a design guide. Strands will alternate ‘under’ and ‘over’ sc’s to create woven appearance. When working through rows where panels are seamed at the shoulders, continue the embroidery detailing across both the front/back of the poncho. When working through rows where the opening of the neckline is, continue using the design guide, but working across only one panel at a time.

Row 1: Using “A” yarn, *weave one vertical line over one sc. Weave one vertical line under one sc. Repeat from the * across the entire row, leaving approx 7”/18cm at each end for tassels. Use the weaving chart below as a guide.
Row 2: Using “A” yarn, *weave one vertical line under one sc. Weave one vertical line over one sc. Repeat from the * across the entire row, leaving approx 7”/18cm at each end for tassels. Use the weaving chart below as a guide.
Row 3 – 11: Repeat row 1 – 2.
Row 12 – 19: Using “B” yarn, repeat row 1 – 2.
Row 20 – 27: Using “A” yarn, repeat row 1 – 2.
Row 28 – 30: Using “C” yarn, repeat row 1 – 2.
Row 31 – 64: Using “A” yarn, repeat row 1 – 2.
Row 65 – 73: Using “B” yarn, repeat row 1 – 2.
Row 74 – 107: Using “A” yarn, repeat row 1 – 2.
Row 108 – 110: Using “C” yarn, repeat row 1 – 2.
Row 111 – 118: Using “A” yarn, repeat row 1 – 2.
Row 119 – 126: Using “B” yarn, repeat row 1 – 2.
Row 127 – 137: Using “A” yarn, repeat row 1 – 2.

+ TASSELS
To create tassels, divide the 78”/198cm lengths from the tartan design into groups of 8 strands (except for one group, which will have 10 strands) evenly along the edge of the poncho, and knot to secure. Trim tassels to desired length.
+ ROLL NECK
Note: For the roll neck, you will be working only into the back loops of the sts (and not through both loops) from the previous row, from row 2 and onwards.
Ch36 using A yarn and 6mm hook.
Row 1: 1 sc in 2nd ch from hook. 1 sc in next 34 sts. Turn your work. (35 sts)
Row 2 – 90: Ch1, 1 blsc in same st. 1 blsc in next 34 sts. Turn your work. (35 sts)
Fasten off, and weave in loose ends.
Sl st together the last row and the foundation chain to form a roll neck. Seam to neckline, lining up the seamline of the roll neck to the centre of the back of the neckline.


Hope you all enjoy this pattern for a pullover poncho, perfect for walks through the highlands.
Be sure to use the tag #hopefulhoneyhive on Instagram to show me your version of my design!
Have a lovely day crocheting…
The post Glencoe Tartan Poncho Crochet Pattern appeared first on Hopeful Honey.


